5.10.6. Select Camera
The user can set the animation viewpoint in the Camera dialog box by clicking the camera icon, as shown in Figure 5.94. The user has to add the Camera List such as Standard Camera, Following Camera, Riding Camera, and Moving Camera.
Note
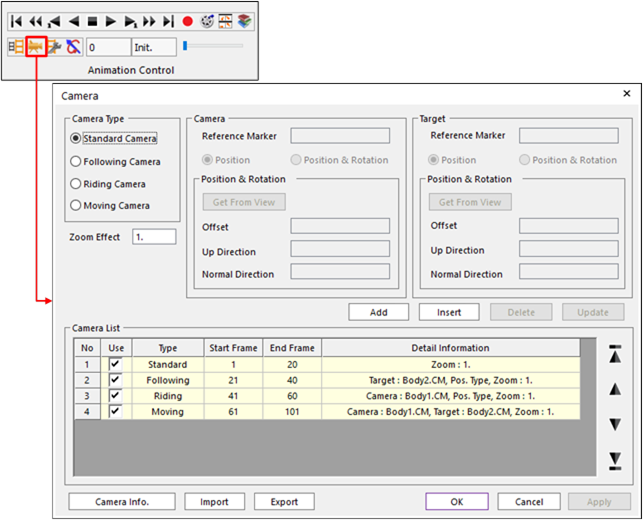
Figure 5.94 Camera dialog box
Camera Type
Standard Camera: Shows the animation using the working plane.
Following Camera: Shows the animation in the view that follows the reference marker and keeps it located at the center of the screen.
Riding Camera: Shows the animation from the view of the selected marker and keeps its viewing direction.
Moving Camera: Shows the animation from the camera reference marker the target reference marker.
Zoom Effect: Applies the zoom effect during the step of each Camera List.
Zoom Effect could be applied to each camera in Camera List.
This effect increases or decreases sequentially to end frame based on the size of start frame at each camera.
Add: Adds the camera information in the Camera List.
Insert: Inserts the camera information in the Camera List.
Delete: Deletes the camera information in the Camera List.
Update: Updates the camera information in the Camera List.
Import/Export: Imports / Exports Camera Information as XML file.
Table 5.17 XML Format XML elements
Information
<Standard><Following><Riding><Moving>
Type of Camera
<Use>
Check ‘Use’ on Camera list
<Start>
Start Frame
<End>
End Frame
<Zoom>
Zoom Effect
<PosType>
Position or Position & Rotation
<CameraRef>
Reference Marker in Camera menu
<TargetRef>
Reference Marker in Target menu
<Offset>
Offset vector
Camera Info.: Shows information about Camera.

Figure 5.95 Camera Info. dialog box