6.1.2.2. Graphic Property Page
This page allows the user to control various options regarding the graphic properties.
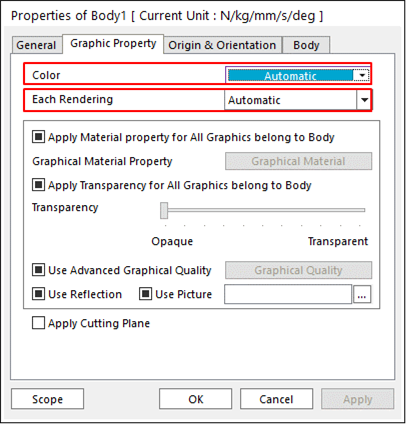
Figure 6.5 Body property page [Graphic Property page]
Color
The color of a body can be defined as one among the supported Standard colors. Additionally, it is possible to select the Custom color which should be defined with the color properties such as Hue., Sat., Lum., Red, Green, and Blue.
Each Rendering
This function allows the user to select the rendering mode on the drop-down menu so that the selected mode can be displayed when Each Render is clicked on Render Toolbar. It supports five type modes such as Automatic, WireFrame, Shade, ShadeWithWire, and Hide. Additionally, this function supports the pop-up menu when clicking the right mouse button on the selected body on Database Window.
Automatic: Select one among the following types automatically.
WireFrame: Displays a body with wire frames in Each Rendering mode.
Shade: Displays a body with shaded surfaces in Each Rendering mode.
ShadeWithWire: Displays a body with both shaded surfaces and wire frames in Each Rendering mode.
Hide: Makes a body disappear on Working Window in Each Rendering mode.
Step to specify each rendering mode
Click Each Render icon on the Render Toolbar.
Select the rendering type in Each Rendering for each body.
Click OK.
Graphical Material Property
It allows the user to change the way to show the lighting effect of a shaded body. By defining the graphic material properties such as Ambient, Diffuse, Specular, Shininess, and Emission of each body, the bodies can be displayed differently in the working window even though the color of the bodies is the same each other.
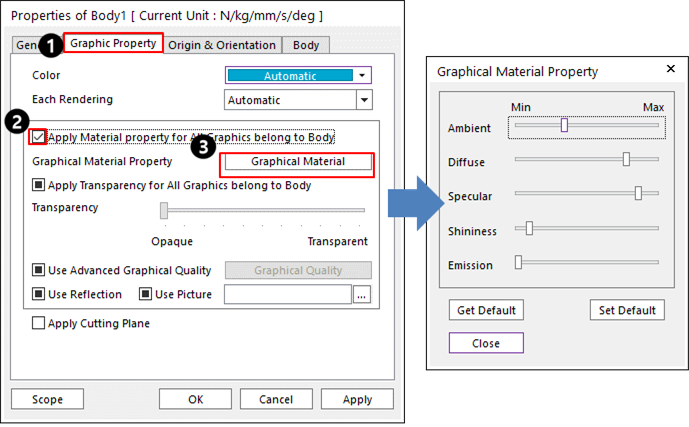
Figure 6.6 Modifying Graphical Material Property
Step to Modify Graphical Material Property
Check the Apply Graphical Material Property for All Graphics belong to Body option.
Click Graphical Material Property.
Adjust the component of graphical material properties.
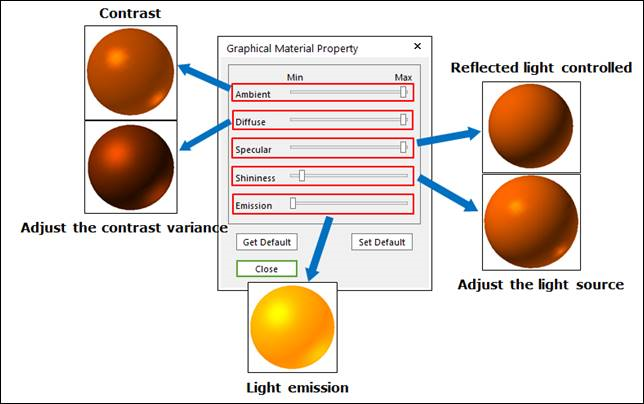
Figure 6.7 Graphical Material Property dialog box
Ambient: Is the light covering the environment without a specific direction and it decreases the light effect gradually.
Diffuse: Is the light to be dispersed in several directions on the surface of a body which comes from the defined direction.
Specular: Makes a body gleam like a mirror reflection.
Shininess: Decides the reflection rate of a body between a glossy and reflective surface and a matte surface.
Emission: Is the light to be distributed evenly in all directions like a light bulb.
Set Default: Makes the user-defined settings of graphic material properties default after changing their values.
Get Default: Gets the user-defined settings of graphic material properties after making the default settings by clicking Set Default.
Click Close.
Transparency
It allows the user to adjust the Transparency slider in order to show the inside of a body when the body is displayed in the Shade Rendering mode.
Step to Activate Transparency
Check Apply Transparency for All Graphics belong to Body option (If it is unchecked, the slider bar is not available.)
Use the slider to control Transparency Intensity. The initial value of the slider is set to be Opaque. If the slide bar is moved to Transparent, the body is transparent gradually.
Use Advanced Graphical Quality
It allows the user to improve the graphic quality for each body by using Advanced Graphical Quality.To activate this function, the Use Advanced Graphical Quality should be checked.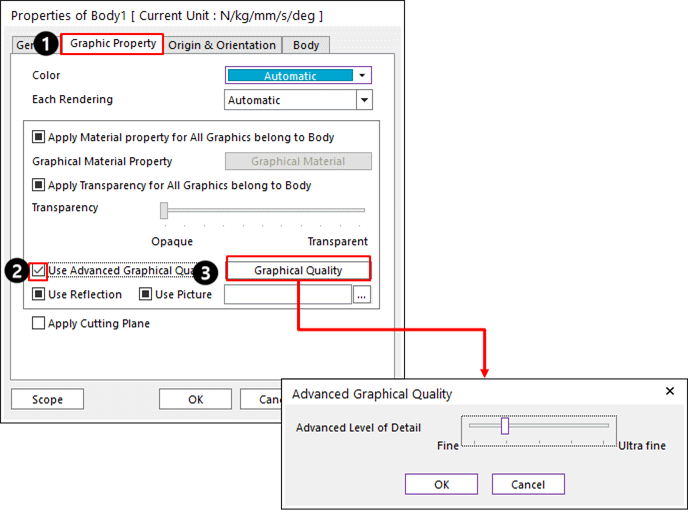
Figure 6.8 Use Advanced Graphical Quality
Step to Use Advanced Graphic Quality
Check the Use Advanced Graphical Quality option to use Advanced Graphical Quality.
Click Graphical Quality.
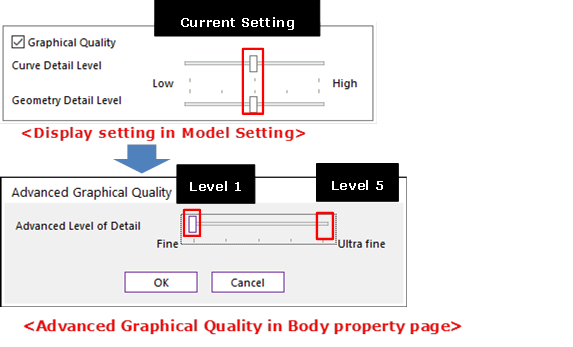
Figure 6.9 Advanced Graphical Quality dialog box
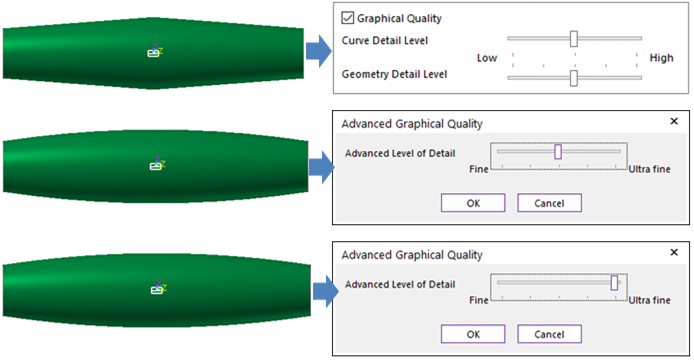
Figure 6.10 Example of using the Advanced Graphical Quality
The Advanced Graphical Quality option has 5 levels.
If Level1 is applied, the graphic quality of a body is improved to one step from the current setting of Graphical Quality in Display dialog box. If the user unchecks Use Advanced Graphical Quality after using Advanced Graphical Quality, the graphic quality of the body is changed to the current setting of Graphical Quality in the Display dialog box.
The application targets of Advanced Graphical Quality are as follows.
Body: General body, toolkit body, and imported body.
Geometry: Curve, surface, and solid.
Note
When applying Advanced Graphic Quality with the maximum level to all bodies in the case of the model with a lot of bodies, the rendering performance can be declined in the Working Window.
Use Reflection
It allows the user to apply the reflection effects onto a body in the Shade Rendering mode as shown below.
Figure 6.11 Reflection effects
If the user wants to set this option as default, Use Reflection Effect as Default option of Display in the Model Setting group of the Home tab should be checked.
Use Picture
It allows the user to wrap the user-selected image onto the body in the Shade Rendering mode.
Apply Cutting Plane
It shows whether this body is cut with a cutting plane or not. If this option is turned off, the body is not cut even if the cutting plane is turned on. Refer to Cutting Plane.

Figure 6.12 Bodies not applied by Cutting Plane